This document is not up-to-date, please refer to the Japanese document.
Creating an AWS IoT
Overview
In enebular, flows and files can be deployed to Devices connected to AWS IoT. The device status can also be confirmed. In order for enebular to be able to interact with your AWS IoT device, an AWS IoT connection needs to be created first.
- Connection Type: Select
AWS IoT - Connection Name
- AWS Access Key ID (Note 1)
- AWS Secret Access Key (Note 1)
- AWS IoT Endpoint: The AWS IoT endpoint required to interact with the AWS IoT device
- IAM Role ARN: Required to execute Rules from AWS IoT
Note 1: The AWS Access Key ID and AWS Secret Access Key can be found in enebular-agent installation. For security reasons it is recommended to use separate keys for creating a connection and installation.
It is recommended to create and use different AWS users for enebular-agent installation and AWS IoT Connection creation.
Precautions
The credentials from a single AWS account should be used to create a single connection only. If multiple connections are created based on credentials from the same AWS account can cause problems with the way enebular communicates with AWS IoT.
When creating a connection, the AWS IoT Rule will automatically create an AWS SNS Topic. Please do not edit or delete the SNS topic.
- AWS IoT -
enebular_shadow_update - AWS IoT -
enebular_status_push_rule - AWS IoT -
enebular_devicestate_push_rule - Amazon SNS -
enebular_status_push_sns - Amazon SNS -
enebular_devicestate_push_sns
Setting up AWS Credentials
A description on how to get the following credentials will be explained below.
- AWS Access Key ID
- AWS Secret Access Key
- AWS IoT Endpoint
- IAM Role ARN
AWS Access Key ID and AWS Secret Access Key allows enebular to interact with AWS IoT and AWS SNS.
Behind the scenes, it creates an AWS IoT rule that detects when there is a change in status to an AWS IoT device. A SNS Topic is also created to allow the status to be reported to enebular. AWS IoT needs certain policies to be able to execute the AWS IoT rule. Having the correct IAM Role ARN, can give AWS IoT those policies.
Creating an IAM Role ARN
From the AWS Management Console, under
Find a Service, go to IAM > Roles > Create RoleUnder
Choose the service that will use this role, chooseIoTand underSelect your use casechooseIoTand click onNext: PermissionsLeave
Attached permissions policiesas is and click onNext: TagsLeave
Add Tagsas is and click onNext:ReviewFor
Role name, enterenebular_status_push_roleand selectCreate roleThe role created will be added to the list of Roles. Select the role created, which in this example's case is
enebular_status_push_roleThe following policies should be the default for the role.
- AWSIoTThingsRegistration
- AWSIoTLogging
- AWSIoTRuleActions
We want to create a custom policy so detach all the current policies by clicking on [×] to reset the policy state.
Click on
Attach policiesand attach the following policies- AmazonSNSFullAccess
- AWSIoTDataAccess
Your Role now has the necessary policies for enebular to interact properly with AWS IoT. Copy Role ARN and paste it in the IAM Role ARN section in the Connection creation screen in enebular.(Connection Info 1)
AWS User
Creating a PassRole Policy
Before creating a user in AWS, first create a PassRole policy. The PassRole policy is attached to an AWS user. It is required to pass Roles specified from an IAM Role ARN.
From the AWS Management Console, under
Find a Service, go to IAM > Policies > Create PolicyClick on
Choose a serviceand selectIAMFrom
Actions, search forPassRoleand check itContinue searching for
GetRoleand check itContinue searching for
ListAttachedRolePoliciesand check ittFrom
Resources, click onAdd ARN. ForAccount, enter yourAWS Account ID. ForRole name with pathenter the Role created earlier in our caseenebular_status_push_roleClick on
Review policyFor
Name, enterEnebularPassRoleand click onCreate Policy
Now we have our policy and we just need to attach it a User.
Creating an AWS User
From the AWS Management Console, under
Find a Service, go to IAM > Users > Add UserFor
User name, enter a username. We will call itenebular-conn-userfor example purposes.For
Access Type, checkProgrammatic accessand click onNext:PermissionsClick on
Attach existing policies directlyand add the following 3 policies:- AWSIoTFullAccess
- AmazonSNSFullAccess
- EnebularPassRole(Explained in
Creating a PassRole Policy)
Click on
Next: TagsandNext: Review.Review that all 3 policies have been set and click on
Create UserSave a copy of
User,Access Key ID,Secret Access Key.Access Key IDandSecret Access Keyare credentials needed when creating an AWS IoT connection in enebular. (Connection Info 2)
AWS IoT Endpoint
From the AWS Management Console, under
Find a Service, go to IoT Core > SettingsThe endpoint under
Custom Endpointis theAWS IoT Endpointneeded when creating an AWS IoT connection in enebular. The endpoint will change based on the selected AWS Region. (Connection Info 3)
Creating a Connection in enebular
From enebular, select a Project and click on Connections from the left side bar. Click on the + button on the bottom right of the page and the following modal will appear.
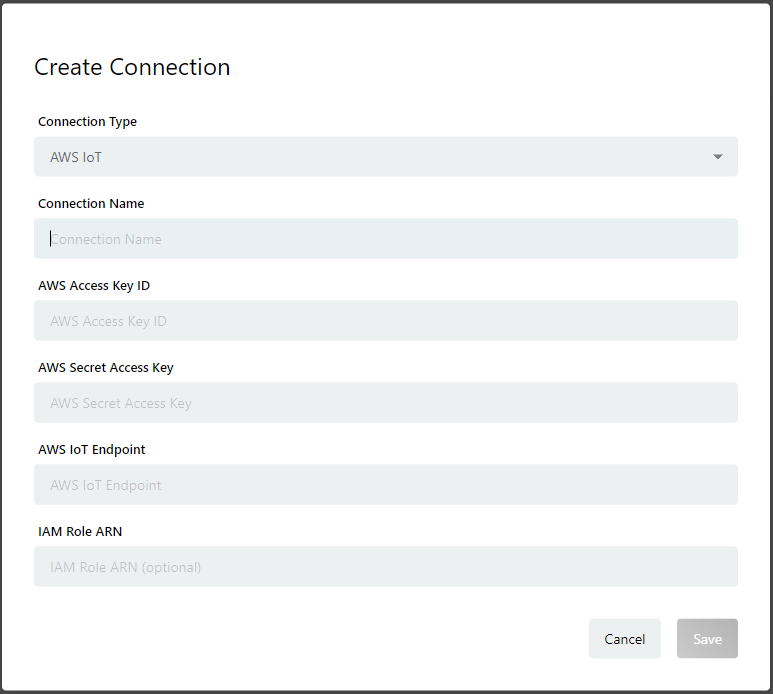
Fill in the following details and click on Save.
- Connection Type: AWS IoT
- Connection Name: A name
- AWS Access Key ID: Refer to Connection Info 2
- AWS Secret Access Key: Refer to Connection Info 2
- AWS IoT Endpoint: Refer to Connection Info 3
- IAM Role ARN: Refer to Connection Info 1
Once a Connection is created, only the Connection Name can be updated. If you want to change other fields, please delete the Connection and create a new one.
Migration for Connections created below enebular version 2.9.0
For Connections created below enebular 2.9.0, a migration is required to view the Device Status for Devices subscribed to Licenses.
Adding IAM Role ARN Refer to Creating an IAM Role ARN on how to create one, and update your existing AWS IoT Connection to include it.
Refer to Creating a PassRole Policy for adding 3 policies support for AWS Access Key ID / AWS Secret Access Key
AWSIoTFullAccess
- AmazonSNSFullAccess
- EnebularPassRole
Restrictions
Let's say we have an AWS Account A. Once an AWS Connection is created from a specified region from AWS Account A, you cannot create a new AWS Connection using the same region from AWS Account A even if the provided Access Keys / Credentials are different. It would count as a duplicate connection and not be recognized. You can however create a new connection by specifying a different AWS Region.
When using enebular-agent version 2.5.0 or above, please make sure to set a IAM Role ARN in your connection.